Well, I've loaded all of my current miniatures onto Picasa. Here are the links:
Sons Of Prospero Chapter: SoP Marines
Bases: All those lovely bases
Terrain: Wasted Imperium
Old Eldar (from the 90s and early 2000s): Pointy Ears
Old IG (also from the 90s/00s): Cobraaaaaaa!!!!!!!
Any thoughts, comments, critiques are welcome.
Monday, November 22, 2010
Friday, October 22, 2010
"Tech Factory" bases final shots...
And here are the "Tech Factory" bases in all their final glory:
40mm:


40mm:


60mm:


"Tech Factory" Large bases...
So, I lied just a bit with my time line. Sorry! So, here goes....
The 40mm and 60mm "Tech Factory" bases from Secret Weapon.

 After washing the bases, they got a good basecoat of black.
 They were then given a second coat of deep grey.
 Followed by a top-coat of Shadow Grey.
 When the completed basecoat was dry, I gave them an initial wash of Vallejo Black Ink.
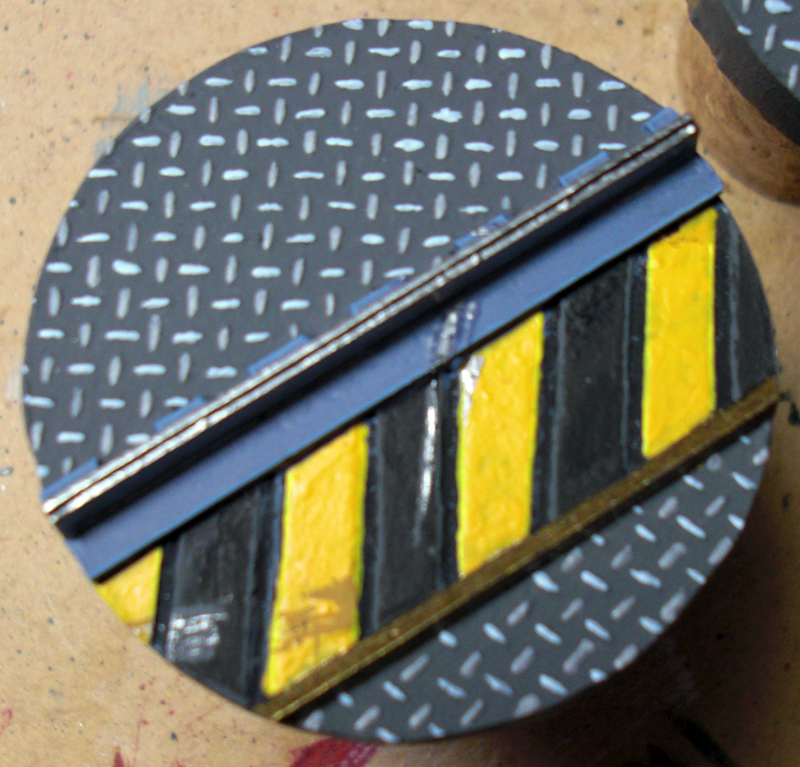
 When the wash was dry, the initial base colors for the details were applied. I used "Golden Yellow" for the warning tracks, gun grey for the stamped metal and "Fenris Grey" for the lighter metal.


 I then continued with the rest of the detailing, adding metallics for pipes and rivets, filling in the warning tracks with black, dry-brushing "Old Brass" on the mesh areas. The stamped metal got alternating patterns of "Fenris Grey" and "Space Wolf Grey" to marked the raised areas.

 The detailing was finished by highlighting the edges, coloring the wires, and adding the initial scratch marks.


 The next step was edging the scratches to make them sit better on the base.


 The next step was adding the oil stains. I started by painting the major spill areas with water. (This step is a bit tedious, as you have to do it one-by-one, so the water doesn't dry to fast.) With the water still wet, I touched a loaded brush (with a mix of Vallejo Black Ink and Devlan Mud) to the water spots. I let the ink bleed with the water and left it to dry however it wanted to.
 To finish them off, I added the actual 'oil' - Realistic water mixed with black ink.
As can be seen below, I used the same process for the 60mm base:


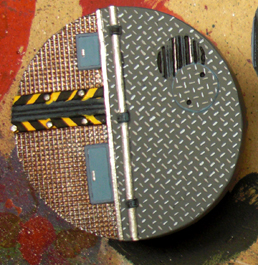
 And that's the large "Tech Factory" bases painted and ready for use with minis.
The 40mm and 60mm "Tech Factory" bases from Secret Weapon.


As can be seen below, I used the same process for the 60mm base:


Thursday, September 30, 2010
Been quite a while...
So, sorry to have neglected this space for such a long time. I've got a few things to put up, but am still in the process of cropping and correcting in Photoshop so they aren't huge files. I hope to have the following up soon:
- 40mm Tech Factory Bases (from Secret Weapon)
- 60mm Tech Factory Base (from Secret Weapon)
- A few terrain pieces I've put together
Monday, June 7, 2010
Too busy...
So, unfortunately, I've been really busy lately. I'm going to try and get some painting done this week, and hopefully get some more guides put up by the end of the month.
I'm still working on the large Tech Factory bases, so those are up next.
Any requests for other items?
Happy painting all!
Sons of Prospero
I'm still working on the large Tech Factory bases, so those are up next.
Any requests for other items?
Happy painting all!
Sons of Prospero
Saturday, May 22, 2010
Ruined Temple 101
So, to continue with my bases, I present the "Ruined Temple" 25mm bases from Secret Weapon miniatures.
To do these bases, you'll need the same materials used with the "Tech Factory" bases - minus the Realistic Water/Oil Stains.
After getting them clipped, filed and looking the way I wanted them to, I washed them in a diluted soapy water (1 part dish detergent to 5 parts water). Then I mounted them and left them overnight to dry.
When they were dry and the glue had set, I gave them a very thin basecoat of Skull White.
 When the Skull White had dried, I added the first undercoat. I gave half the bases a Graveyard Earth coat and half a Khemri Brown coat.
 When this had dried, I gave them a second undercoat. Again, dividing them in half. One set got a mix of Vallejo Ivory and Vallejo Off-White. The other set got Kommando Khaki.
 At this point, I went back into the recesses with a toothpick to remove any built up paint and gave the areas a coat of Devlan Mud.
 When the ink dried, I gave them a coat of Vallejo Ivory.
 I then gave them a heavy drybrush of Bleached Bone (just short of a full coat).
 They then received a drybrush (real drybrush) of Skull White.
 So, I now had the basic marble color the way I wanted it. It was time to go back in and work on the grout.
For the grout, I first used a variety of the dark browns in the Citadel range (IIRC I used Desert Yellow, Bestial Brown, Scorched Earth and Calthan Brown).
 Try to paint the recesses with the brush angled toward the smaller "strips" of the surface - as these will be covered over later (easier to fix!).
I then painted Ogryn Flesh Wash into the recesses and large cracks and "divots".
 So, now the grout is finished. Time to move onto the small surface areas.
I started by giving them a base of Vallejo Scarlett Red (on half) and Scab Red (on the other half).
 The Scarlett Red bases then got a coat of Vallejo Gory Red. The Scab Red bases got a coat of Red Gore.
(Though they are basically the same color, it's amazing how different they are when fully dry!)
 They then received a drybrush of Blood Red.
 The hard edges and upward points of the rubble areas were then given a detail of Blazing Orange.
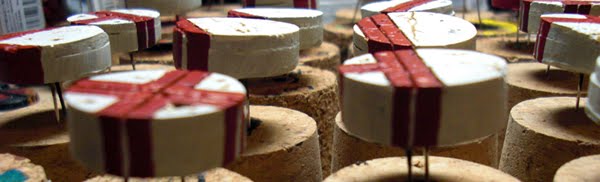
 At this point, I also went back in and "continued" the bases down the side. These bases had a very distinctive "dividing line" around the circumference. The Scarlett Red/Scab Red was continued down to the very bottom of the base. The Gory Red/Red Gore was only continued down to the dividing line. The grout areas got a mix of Bleached Bone and Rotting Flesh all the way to the bottom of the base.
 I then returned to the cracks and divots in the base and gave them another wash of Gryphonne Sepia.

 The marble parts of the bases were now basically done. I know moved on to the gilding and the hard edging.
For the gilding, I painted a very thing line of Shining Gold on any straight edge (of the red marble) - again, only the straight edges, if there was a crack or divot, the gilding would be lost.

 For the hard edging, I went in with Titanium White and painted any straight edge or large "side" piece of the cracks.

 To finish the bases I gave the entire surface, sides and bottom one final - and liberal - coat of Gryphonne Sepia.
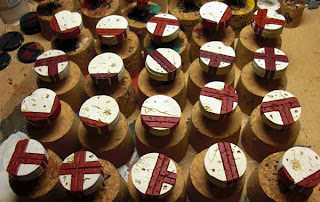
 And there's a set of fully finished "Ruined Temple" bases!
Some shots of them in a nicer presentation:


Hope you find this useful!
As always, happy painting!
Sons of Prospero
To do these bases, you'll need the same materials used with the "Tech Factory" bases - minus the Realistic Water/Oil Stains.
After getting them clipped, filed and looking the way I wanted them to, I washed them in a diluted soapy water (1 part dish detergent to 5 parts water). Then I mounted them and left them overnight to dry.
When they were dry and the glue had set, I gave them a very thin basecoat of Skull White.


For the grout, I first used a variety of the dark browns in the Citadel range (IIRC I used Desert Yellow, Bestial Brown, Scorched Earth and Calthan Brown).

I then painted Ogryn Flesh Wash into the recesses and large cracks and "divots".

I started by giving them a base of Vallejo Scarlett Red (on half) and Scab Red (on the other half).

(Though they are basically the same color, it's amazing how different they are when fully dry!)


For the gilding, I painted a very thing line of Shining Gold on any straight edge (of the red marble) - again, only the straight edges, if there was a crack or divot, the gilding would be lost.


Some shots of them in a nicer presentation:


Hope you find this useful!
As always, happy painting!
Sons of Prospero
Subscribe to:
Posts (Atom)


